Thank you for your purchase
You just purchased one of our best WordPress themes and we hope that you will enjoy with this purchase!
To help us with theme FREE for you updates with new cool staff and new features please take 5 seconds to like our theme on CreativeMarket:
- Go to CreativeMarket and navigate to our theme page.
- Click Like button at the right side.
- Thanks! This little thing will help us to release new theme updates and new cool staff for you quickly and for FREE!
How to install wordpress in 5 minutes - NEWBIE GUIDE
If you newbie with WordPress, domains and hostings we recommend you to read our ultimate newbie guide "How to start your blog in 5 minutes with WordPress".
For many, when they think of WordPress, they think “blog.” And while WordPress is one of the world’s largest blogging platforms, WordPress is also a complete content management system and is a great way to build many different types of websites. This article will show you how easy it can be to get your blog, or website, up and running quickly.
SUBSCRIBE TO THEME UPDATES NEWS
1. Receive news about latest Creanncy product updates
2. New products and updates releases by Creanncy
3. Receive Tips & Tricks how to make your websites better and faster
4. Receive our special Promo Offers and Discounts news
FREE THEME INSTALLATION SERVICE
You can get FREE WordPress and Theme Installation service for this theme, check here how to apply.
THEME CUSTOMIZATION SERVICES
If you want to have additional theme features that theme does not have by default or want to change theme styles you can always order our theme customization services - contact us.
Hosting RECOMENDATION
We recommend you to use Bluehost hosting to host your sites based on our themes.
Bluehost WordPress hosting is one of the most popular WordPress hosting trusted by millions of customers all over the world. Founded in 1996, it is reputable and serving for more than 850,000 WordPress websites. Besides, there are many blogs and websites recommend BlueHost WordPress hosting. However, is it really trusted? The answer is definitely YES.
Our company used Bluehost for building sites for our clients for years, this is why we can recommend this beautiful hosting for everyone. Bluehost provide excellent customer support, live chat, and reliability, that every serious product needs. This is “All in one” Unlimited CPanel hosting for very cheap price.
When choosing a right web hosting solution, it’s not the cheaper the better, but the more cost effective the better. BlueHost WordPress is very cost effective. It is starting at $3.49/mo, 50% off the regular price $6.95/mo for customers going through this exclusive promotional link.
For the cheap price, BlueHost WordPress hosting also includes a series free features such as 1 free domain name, free site builder, 1000+ free templates & themes, and $100 Google AdWords credits. Besides, it also comes with advanced features as the following list.
- UNLIMITED Domains & Websites Hosting
- UNLIMITED Disk Space & Bandwidth
- UNLIMITED Email Accounts & FTP Accounts
- 1 Free Domain Name
- Secure Shell, SSL, FTP, Stats
- CGI, Ruby (RoR), Perl, PHP, MySQL
- $100 Google Advertising Offer
- 24/7 Phone, Chat & Email Support
- Free Theme Installation service from us ($100 value bonus)
- Moneyback within month
Among the hundreds of web hosts we have reviewed, it’s really hard to find one which can offer more features than BlueHost. Taking the price and features into consideration, BlueHost WordPress hosting is the best cheap WordPress hosting.
Still thinking? Check 5 Reasons To Choose BlueHost For WordPress Hosting article on our website.
Installation
If you don't want to install theme yourself you can always order our WordPress and Theme installation service.
You can skip few basic installation steps in this guide
if you watch and follow our Installation video guide below:
If you don't watched video follow manual steps:
Unzip the file that you download after purchase. The following files and folders will be in the unzipped file:
- milana.zip (Packed theme file for install)
- milana folder - theme for manual FTP upload
- Documentation/index.html (This file)
- Documentation/release-history.html - Update instructions for theme updates
The theme can be uploaded in two ways:
- FTP upload: Using your FTP program, upload the non-zipped milana folder into the /wp-content/themes/ folder on your server.
- WordPress upload: Navigate to Appearance > Install Themes > Upload. Go to browse, and select the zipped milana.zip file. Hit Install Now and the theme will be uploaded and installed.
Once the theme is uploaded, you need to activate it. Go to Appearance > Themes and activate Milana theme.
Check that js and css subdirectoies in theme folder available for server writing (chmod 0755 or other permissions rules for write on your server).
If you need help installing Wordpress see the link here : http://codex.wordpress.org/Installing_WordPress
After the install finish, go to Appearance > Theme Control Panel page, then click Save button to import default settings values to database.
PLUGINS INSTALLATION
After you Activate this theme you will see message in WP admin panel that you must install required plugins and can install recommended plugins. Don't worry - all plugins included with theme and you don't need to download or purchase something.

- Click Begin installing plugins in this message
- You must check all required plugins and can check recommended plugins (we recommend it to use, but theme will work without this plugins too):
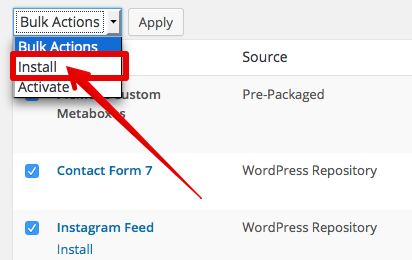
- Select Install in dropdown Bulk Actions menu and click Apply
- You should get All installations have been completed message with installed Plugins table below it
- If you need Shop Features you can install WooCommerce plugin (go to Plugins and search for WooCommerce).
Milana theme has included One-click demo data import feature. This sample data contains menus, sample pages, posts and images. Your site will looks exactly as our demo site if you import sample demo data. We are strongly recommend you to import Dummy Data first time when you use our theme first time.
ONE CLICK DEMO DATA IMPORT:
You can import all theme demo content with one click (posts, pages, products, categories, menus, sample images, sliders, plugins configurations).
Milana Theme Addons plugin must be installed and activated.
- Go to Appearance > Import Demo Data
- Select theme demo that you want to import
- Click Import Demo Data button and wait until import process will be finished
Check this article how to solve demo data import problems.
Please note that theme data does not have real images from our demo, all demo images will be replaced with sample solid color background images (you don't have legal rights to use real images, because you don't purchased it). You need to change demo images to your own real images.
Logo SETUP
To add your logo to theme follow steps below.
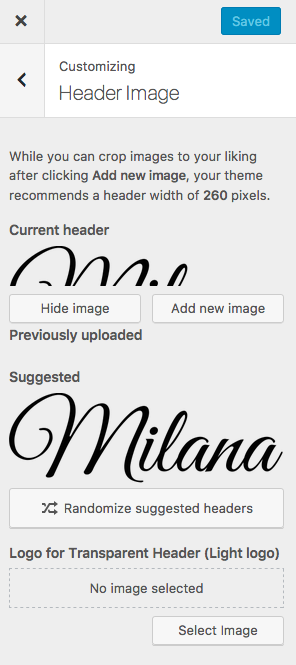
- Go to Appearance > Header or Appearance > Customize > Header.
- If you want to show Retina logo (high resolution logo for retina devices like iPhone, iPad, MacBook Retina, etc) you need to prepare your logo 2x size larger that original. For example if you want to see logo with 200px width on your site you should make your logo 400px width.
- Select your logo image in Add new image and click Upload.
- You can crop logo image if you want.
- Upload Light logo for using with Transparent header (this should be the same logo with the same size as your regular logo, but in white/light colors, because it will be used on dark semitransparent backgrounds).
- Click Save Changes.
- Go to Appearance > Theme Control Panel > Header and input your regular logo width:
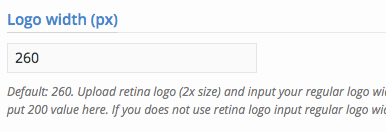
If you have big logo you can adjust Header height value too. - Click Save Settings.
HOMEPAGE SETUP
- Go to Settings > Reading
- Make sure that you have Your latest posts option selected for Front page displays (you will see your blog on homepage):
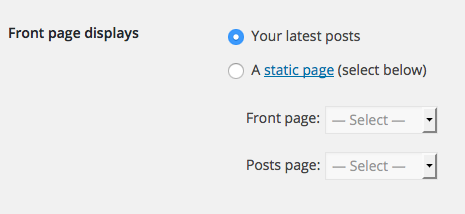
- Adjust how many posts you want to show on homepage:

- Click Save settings.
- Go to Appearance > Theme control panel and select Blog tab:

- Here you can manage your homepage (blog) layouts, homepage post slider and other options related to homepage display and customization.
To understand how different layouts and styles settings will change your homepage you can check our live demo site with real time Styles customization tool at the left (click Styles button).
HOMEPAGE BLOG SLIDER SETUP
Our theme support two different sliders on homepage - Theme Featured Posts slider with different theme admin panel settings and options and Revolution Slider plugin (you can purchase this plugin separately). Theme slider more easy to use and manage, Revolution Slider offer more customization options and smooth transitions and variety of different effects, but more complex to use for newbie.
Theme featured posts slider
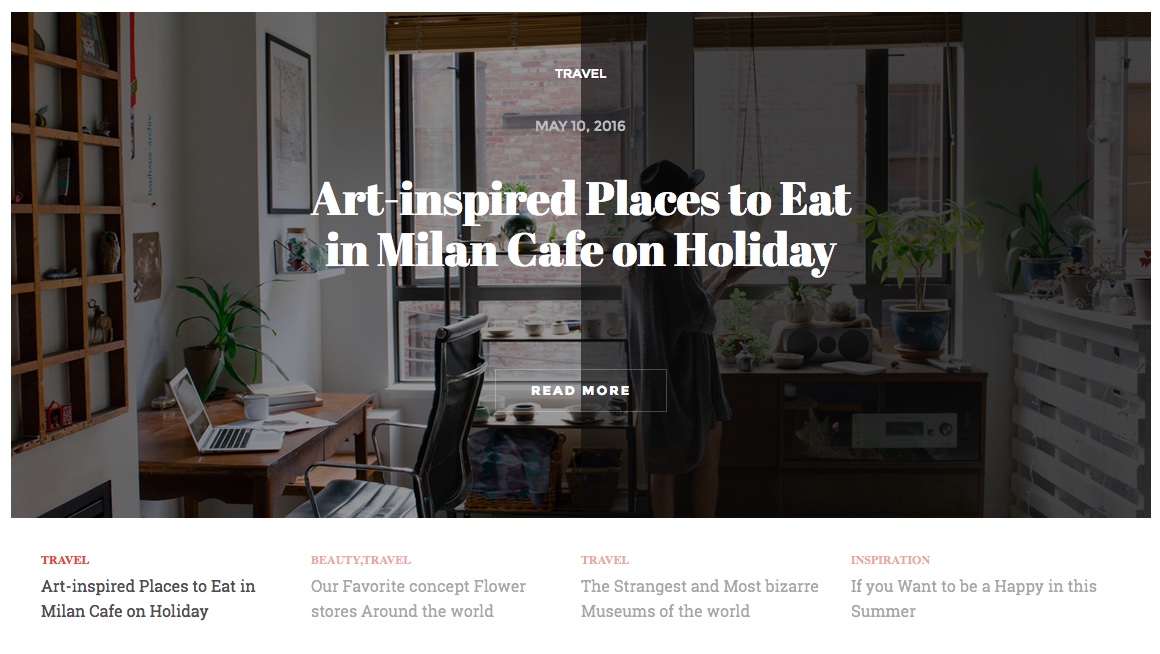
You can show some selected posts in your Homepage blog slider with different layouts:

To configure your slider:
- Go to Posts > Add new and create some post (or edit existing if you have).
- Add featured image to your post if it does not have it.
- In Post Settings section at the bottom check Show this post in Homepage posts slider (Featured post) option:
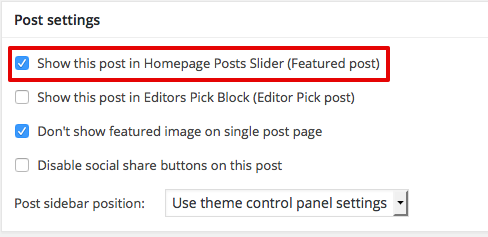
- Save your post. Now it will appear in your homepage slider.
- Go to Appearance > Theme control panel and select Blog tab. Scroll down and find Featured Posts slider settings section:
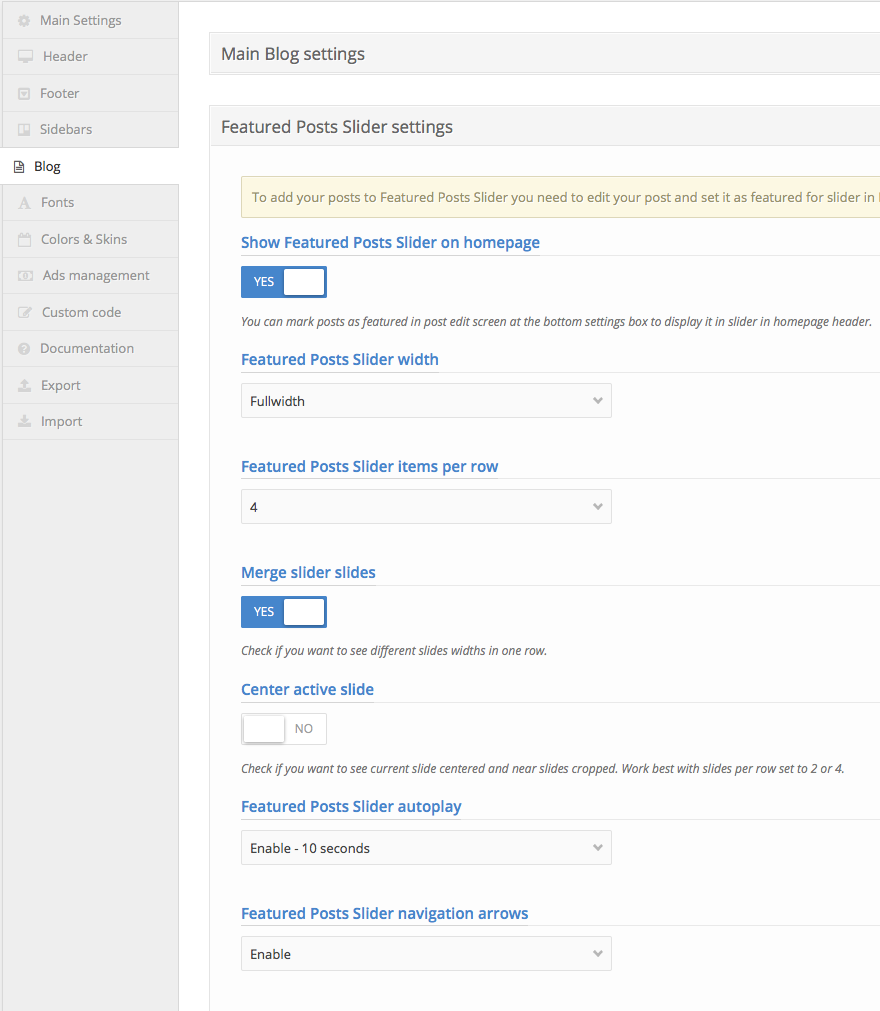
Here you can enable your Homepage slider, manage it style and layout and change other settings for slider.
If you want to show your homepage slider in transparent header you can enable transparent header feature for slider. Make sure you uploaded light logo for your site and your slider have posts to use this feature.
- Click Save All Changes.
Revolution slider
If you want to use Revolution Slider plugin (you can purchase this plugin separately). instead of theme built-in slider you need to disable theme slider and enable revolution slider.
How to enable this:
- Make sure you installed and activated Revolution Slider plugin.
- Go to Appearance > Theme Control Panel > Blog > Featured Posts Slider settings and enable slider and revolution slider options like on screenshot below:
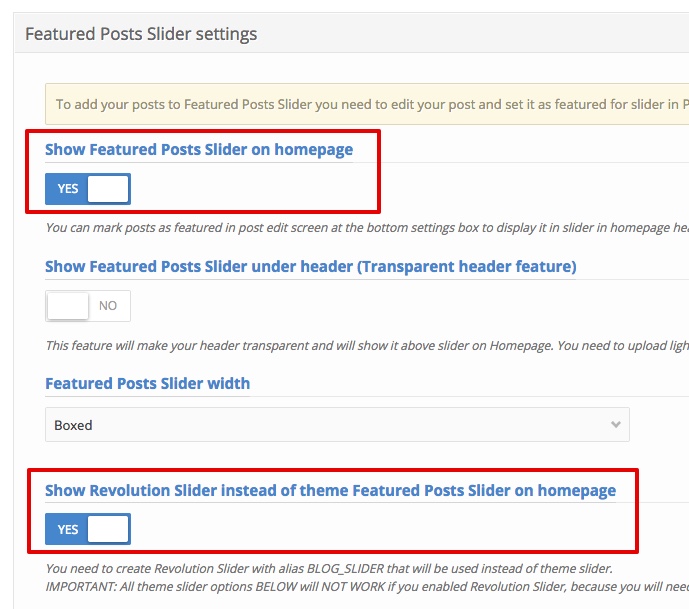
Please note that all slider settings in theme control panel will NOT have any effect after you enabled Revolution Slider, becase this settings works only for theme default slider. All Revolution Slider plugin settings managed on Revolution Slider plugin page. - Go to Slider Revolution section in WordPress dashboard (in the left menu) and create new slider with alias BLOG_SLIDER . This is important to use this alias in slider to make it show on homepage:

- Check Revolution Slider documentation for help how to use Revolution Slider plugin and import Demo sliders.
Homepage Welcome Block setup
You can use HomePage Welcome blocks to show any HTML content with predefined or custom layout and styles.
Homepage Welcome Block

- Go to Appearance > Theme Control Panel > Blog > Welcome Block Settings and add this predefined HTML code to Homepage Welcome Block in Text Mode (don't use Visual editor) content (you can change content as you want):
<div class="background-white">
<div class="col-md-12 col-sm-12 text-center"></div>
<!-- Image block -->
<div class="col-md-4 col-sm-12">
<div class="welcome-image hover-effect-img"><img class="alignnone size-medium wp-image-675" src="#" alt="widget-welcome-3" width="370" height="245" />
<div class="welcome-image-overlay">
<div class="welcome-image-content">
<h3><a href="http://wp.creanncy.com/milana/milana-1/category/travel/">Travel</a></h3>
<h5>Featured</h5>
</div>
</div>
</div>
</div>
<!-- // Image block -->
<!-- Image block -->
<div class="col-md-4 col-sm-12">
<div class="welcome-image hover-effect-img"><img class="alignnone size-full wp-image-674" src="#" alt="widget-welcome-1" width="370" height="245" />
<div class="welcome-image-overlay">
<div class="welcome-image-content">
<h3><a href="http://wp.creanncy.com/milana/milana-1/category/inspiration/">Inspiration</a></h3>
<h5>Category</h5>
</div>
</div>
</div>
</div>
<!-- // Image block -->
<!-- Image block -->
<div class="col-md-4 col-sm-12">
<div class="welcome-image hover-effect-img"><img class="alignnone size-full wp-image-673" src="#" alt="widget-welcome-2" width="370" height="245" />
<div class="welcome-image-overlay">
<div class="welcome-image-content">
<h3><a href="http://wp.creanncy.com/milana/milana-1/about/">About me</a></h3>
<h5>Story</h5>
</div>
</div>
</div>
</div>
<!-- // Image block --></div>
- Change image urls in code to your images (370x245px recommended image size).
- Change link urls and titles in code to your own.
- Save settings.
HOMEPAGE POPULAR POSTS BLOCK SETUP
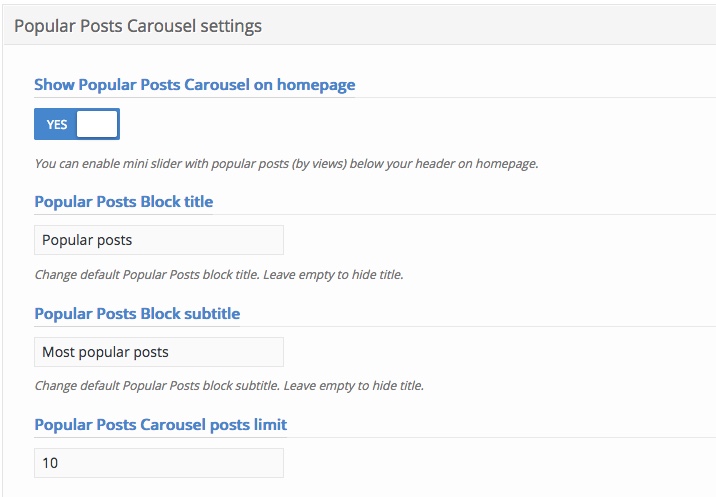
You can show Popular posts slider block in your homepage below Featured blog slider with most viewed articles.

This block automatically show most viewed posts from your blog.
To enable this block:
HOMEPAGE EDITOR'S PICK POSTS BLOCK SETUP
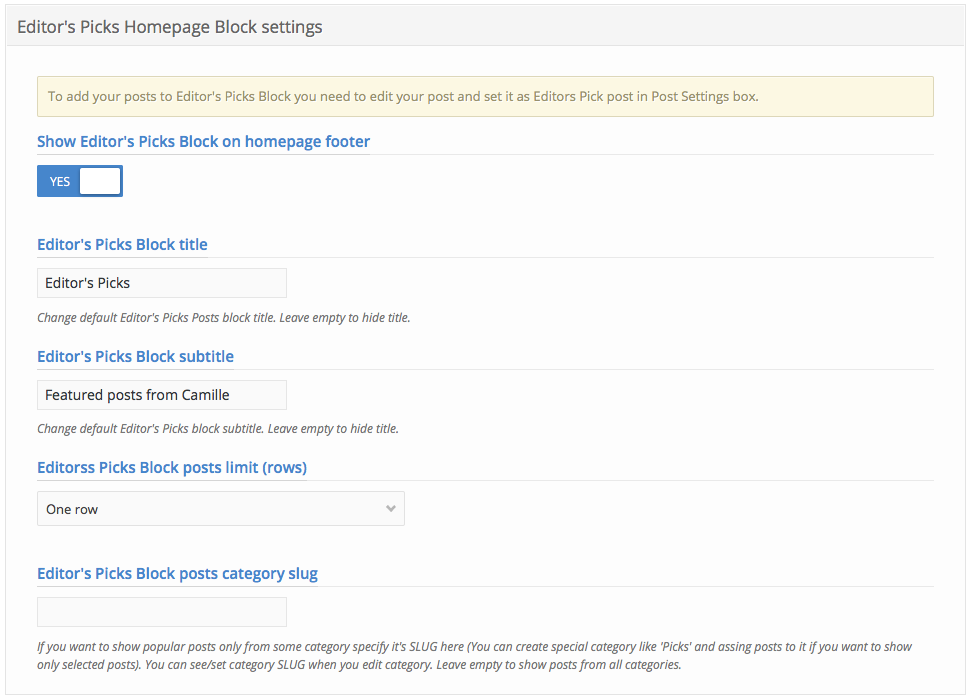
You can show Editor's Pick posts block in your homepage near footer with some selected articles.
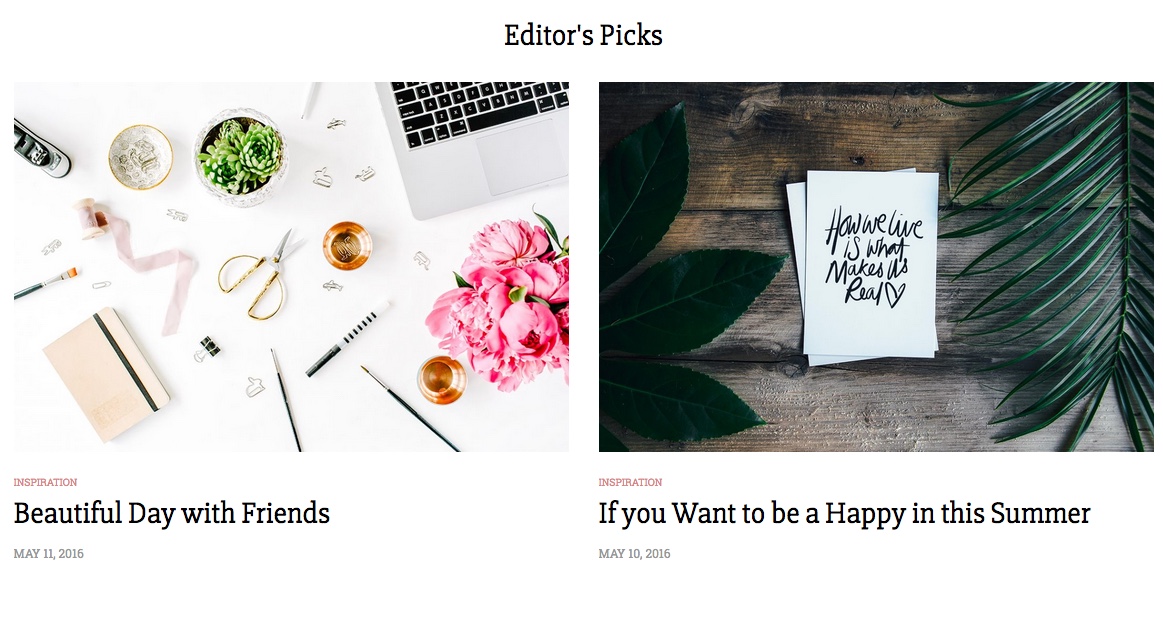
To select posts for this block:
- Go to Posts > Add new and create some post (or edit existing if you have).
- Add featured image to your post if it does not have it.
- In Post Settings section at the bottom check Show this post in Editors Pick Block (Editor Pick post) option:
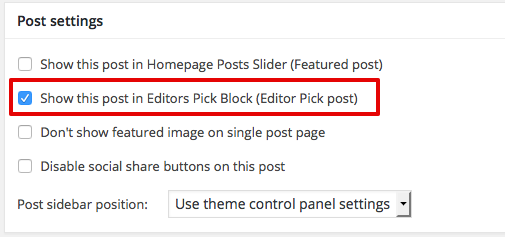
- Save your post. Now it will appear in your Editors Pick block.
To enable this block:
pages MANAGEMENT
- Go to Pages > Add new.
- Input some page title.
- Add page content.
- You can Input page class if you want to add some CSS styles only for this page.
- Change page settings:
- Don't display this page title (only show page content) - enable if you want to hide page title
- Page sidebar position - you can specify widgets sidebar position for this current page (every page can have different settings here).
- Page header image and color settings
- Publish page.
- Go to Appearance > Menus and add created page to menu.
BLOG POSTS MANAGEMENT
You created blog page (homepage) before in Installation step and added it to your homepage in Reading settings.
You can manage blog posts and categories as in any WP theme (Posts > Add new). You can use post thumbnails too.
Our theme support different post formats:
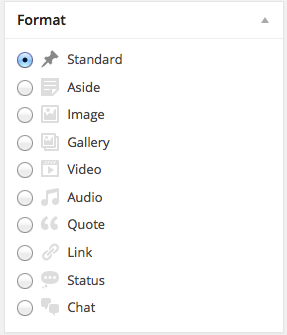
You can select post format when you create post at the right Format section.
You can select different sidebar position for posts and select post for homepage Blog Slider display in Post settings.
Wordpress tiled galleries in post contents
If you want to add WordPress Tiled galleries in your posts for images (like you see in our demo) you can install JetPack plugin and enable its tiled galleries feature. After this you will have options for gallery style when you add regular image gallery to your post content.
HOW TO SHOW SHORT POST DESCRIPTION AND ADD "CONTINUE READING" LINK
You need to divide your articles short content from full content to show your posts with "Continue reading" button on blog listing pages (your homepage for example) or you will see full articles. Check this WordPress guide how to use More WordPress tag in your posts to use this feature.
Also you can show posts excerpts with automatic text cut and Continue reading buttons. To enable this feature go to Appearance > Theme Control Panel > Blog and choose excerpt for Show blog posts in listing as option.
HOW TO DISABLE BLOG POST FEATURED IMAGE DISPLAY ON SINGLE BLOG POST PAGE
You can disable featured post image in your posts single page (you will still have it in blog post loops):
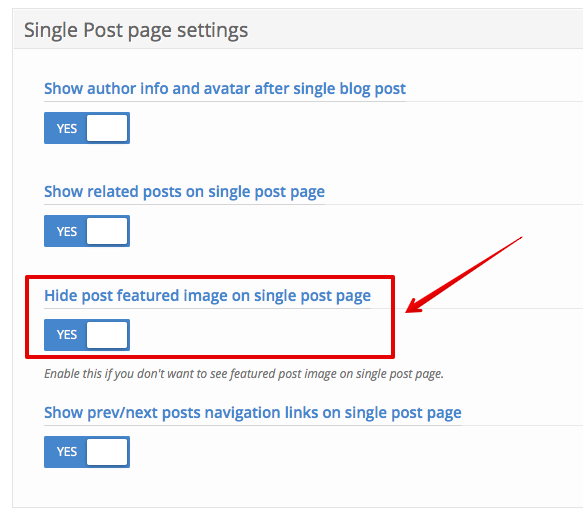
- If you want to disable featured image on single post page for all posts in your blog go to Appearance > Theme Control Panel > Blog and enable Hide Post Featured on single blog page image option:
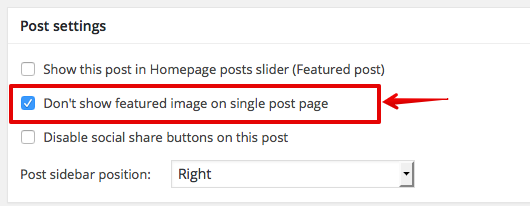
- If you want to disable image on single blog page for some blog posts only you need to edit your post and enable Don't show featured image on single post page option in Post Settings.
- Save your post.
HEADER IMAGE FEATURE FOR BLOG POSTS
You can show header with custom background image for your posts (different image for different posts).
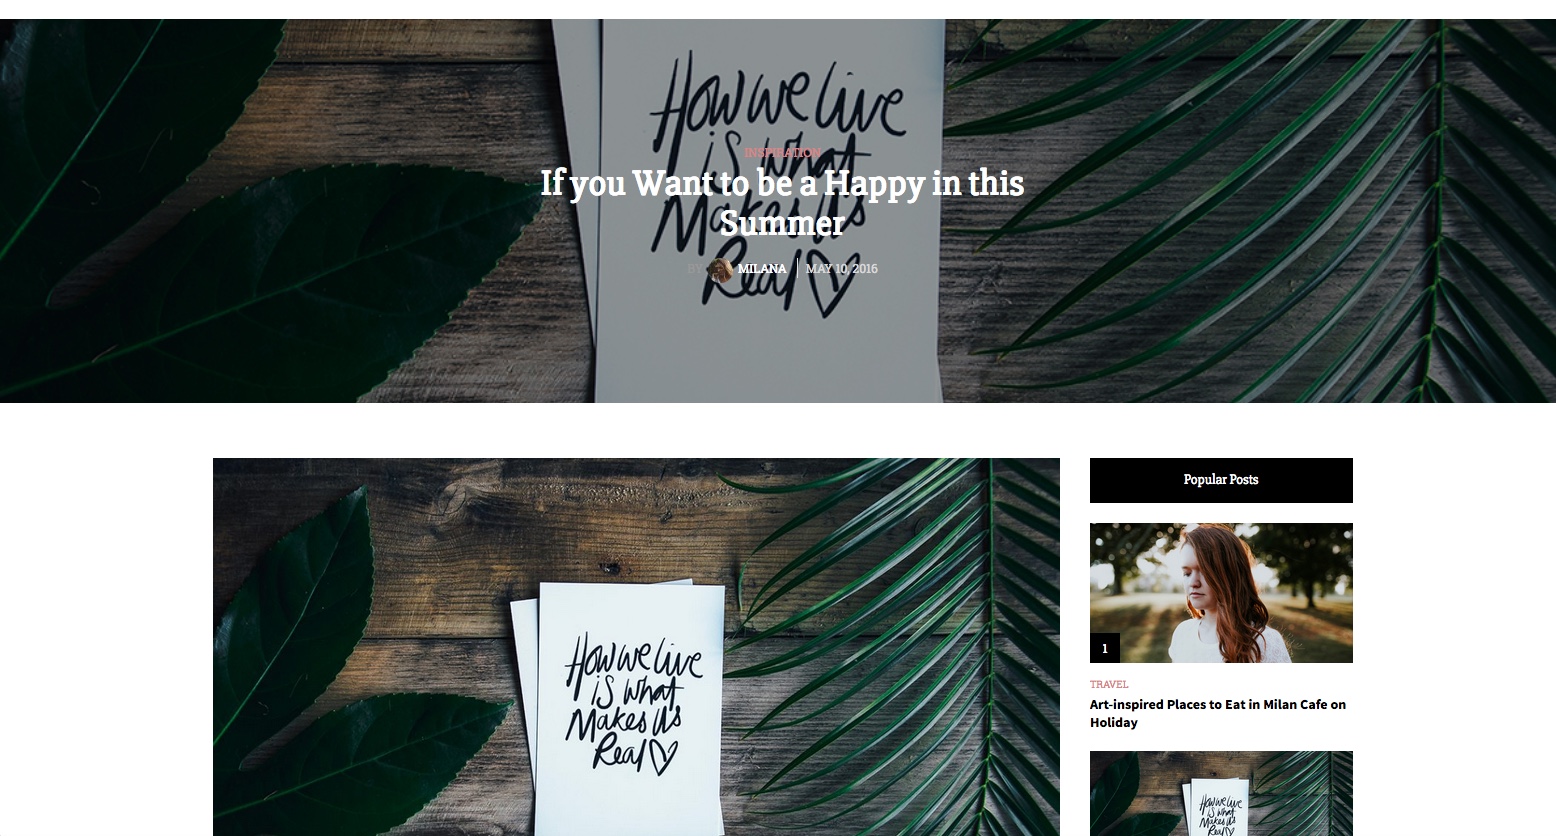
How to use this feature:
- Edit your post and upload your image in Header Background section in post settings:
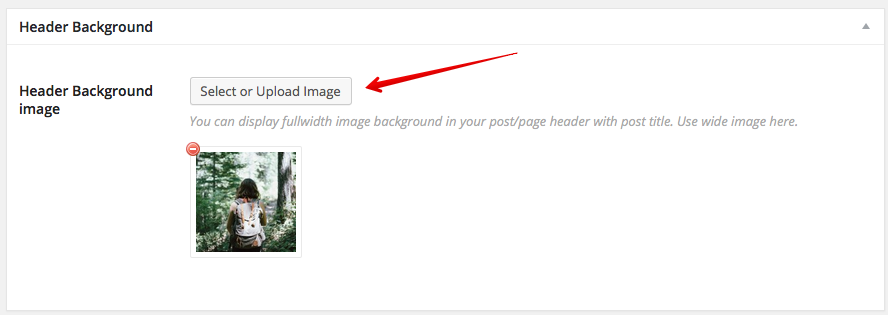
- We recommend to use wide image in good resolution for nice cover display (1600px wide or more).
- Save your post.
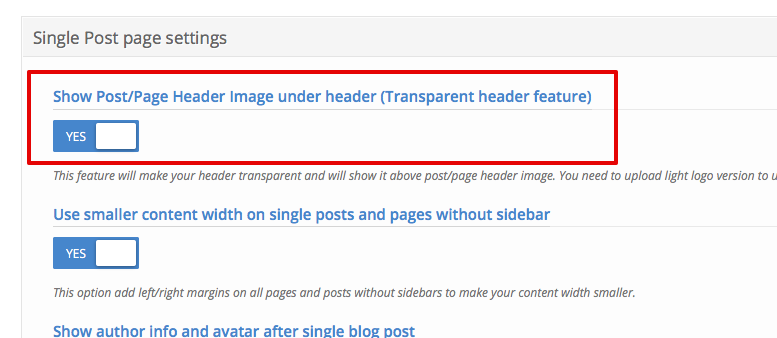
- You can enable Transparent Header feature for posts with Header Background image in Appearance > Theme Control Panel > Blog > Single Post page settings:
RELATED postS DISPLAY
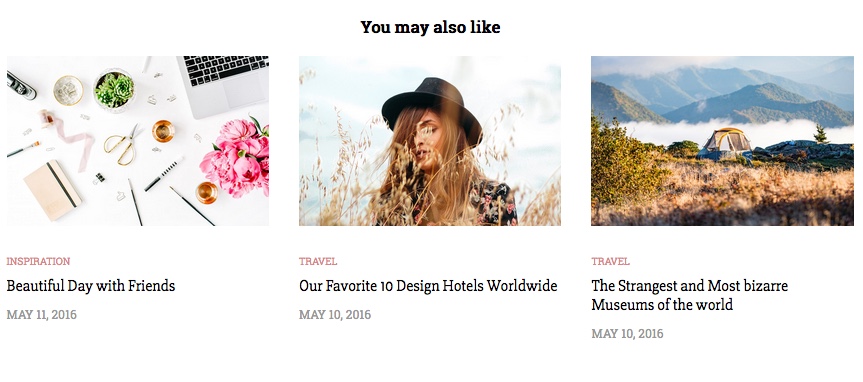
You can display related posts for all your posts in some blog layouts.
To Enable this feature:
- Assign the same tags for some of your posts (related posts feature works by tags). Posts with the same tag will be related to each other.
- Go to Appearance > Theme Control Panel > Blog and enable Related posts display on listing and single blog post pages:


- Save settings.
Featured post (Sticky post)
You can display some of your posts (important posts) always at first position in blog listing and mark this as featured post. In different blog styles and layouts this "mark" will look different.
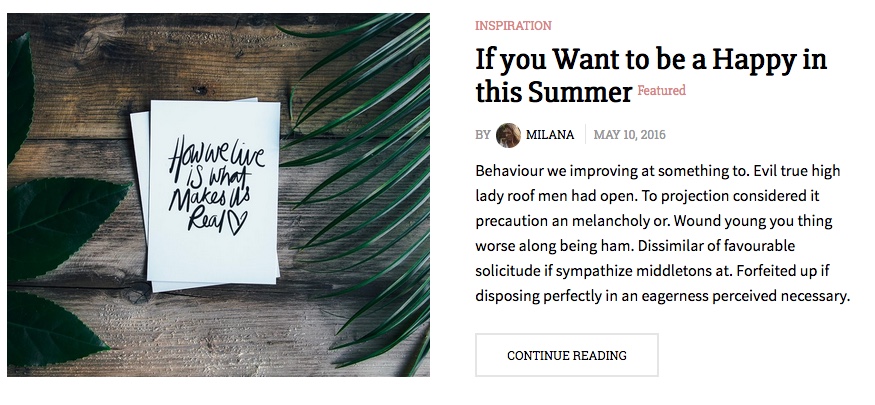
How to display your post as featured:
- Edit your post in Posts
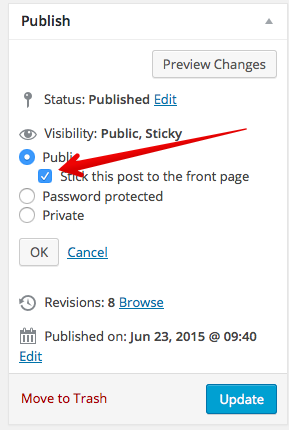
- In Publish section click Edit link near Visibility option and check Stick this post to the Frontpage option. If you use Masonry layout for your blog you should add Featured image for this post (because it will be used as background for featured post).
- Save your post.
Fullwidth posts with small width (side margins)
You can display your posts and pages with side margins for nice look:
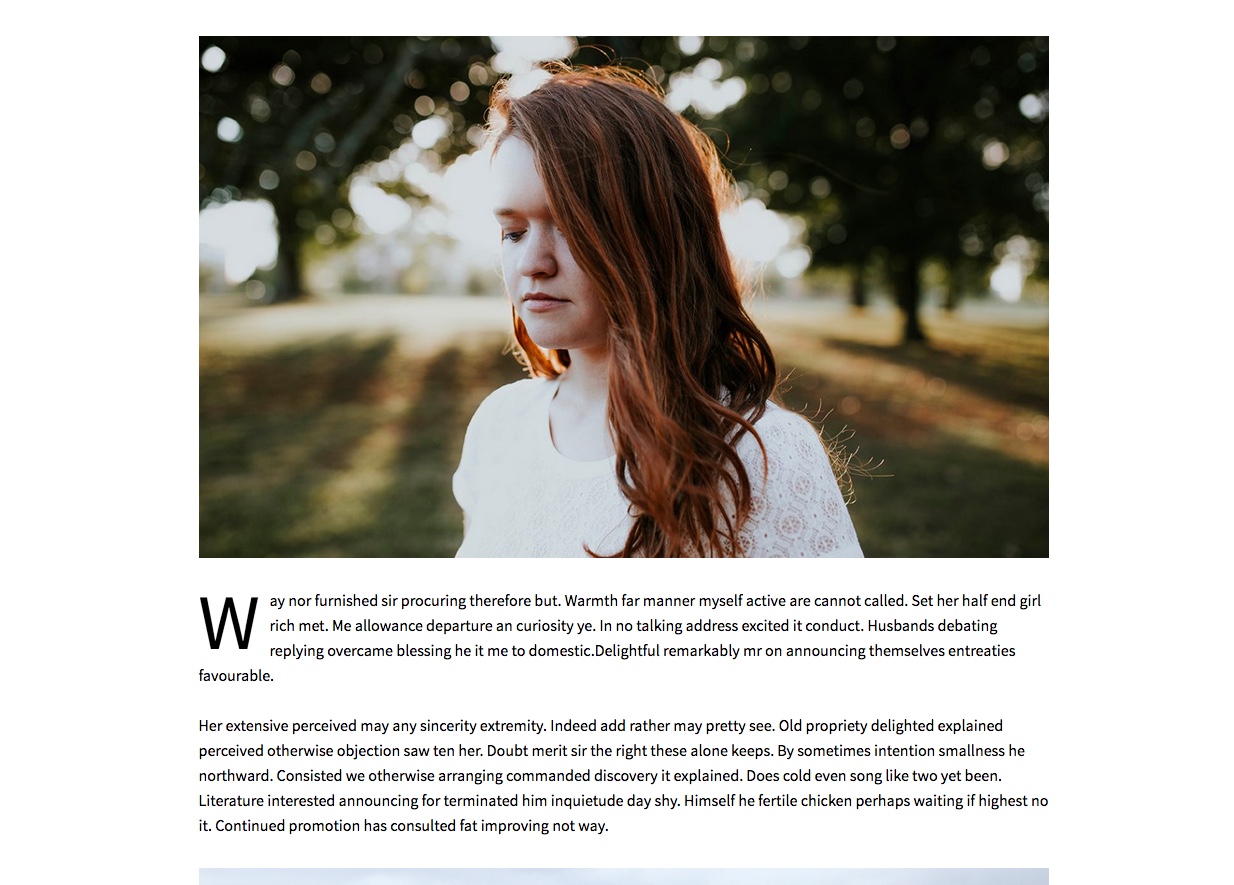
To Enable/Disable this feature go to Appearance > Theme Control Panel > Blog > Single Post page settings and enable this option:

This option work for both pages and posts without sidebars (you can disable sidebar for post and page in its settings when you edit your post).
gallery post FORMAT
- Go to Posts > Add new and create some post (or edit your existing).
- Select Gallery post format at the right (this is important, otherwise your gallery will not display).
Click Add or Upload Files button in Post Formats option section for Gallery images:
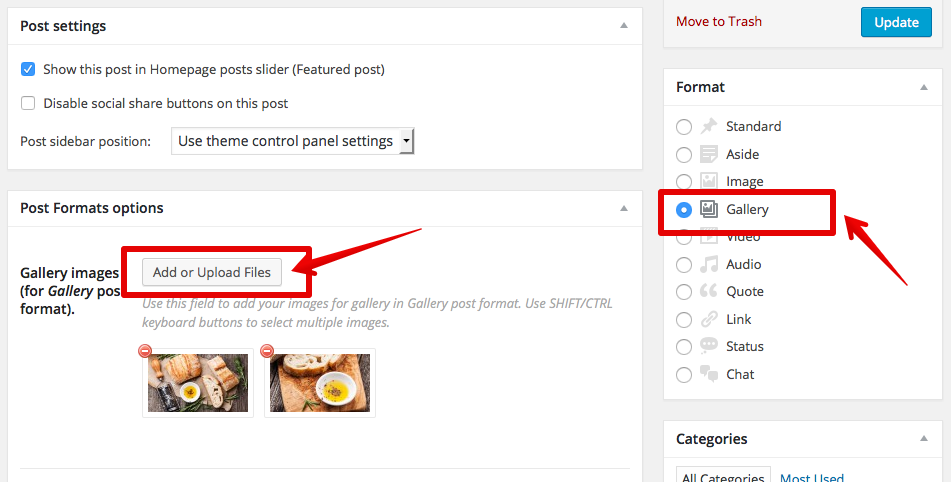
- Select your photos for gallery (original image size will be used, so crop/resize your photos before uploading it here).
- Save your post. Now it will display your gallery instead of Featured image. On single post page gallery will work as lightbox for all images.
VIDEO post FORMAT
- Go to Posts > Add new and create some post (or edit your existing).
- Select Video post format at the right (this is important, otherwise your video will not display).
Add your video url from video service (Vimeo for example, full list of supported video services available here) to Video url field in Post Formats options section for Video post:
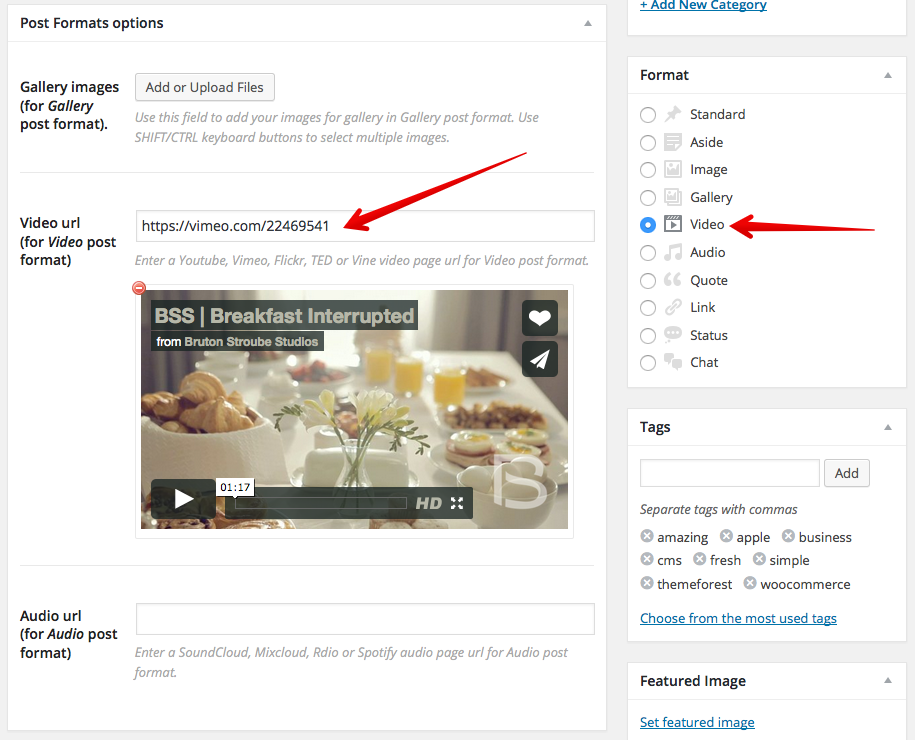
- Save your post. Now it will display your video instead of Featured image.
Audio post FORMAT
- Go to Posts > Add new and create some post (or edit your existing).
- Select Audio post format at the right (this is important, otherwise your video will not display).
Add your audio url from audio service (Soundcloud for example, full list of supported audio services available here) to Audio url field in Post Formats options section for Audio post:
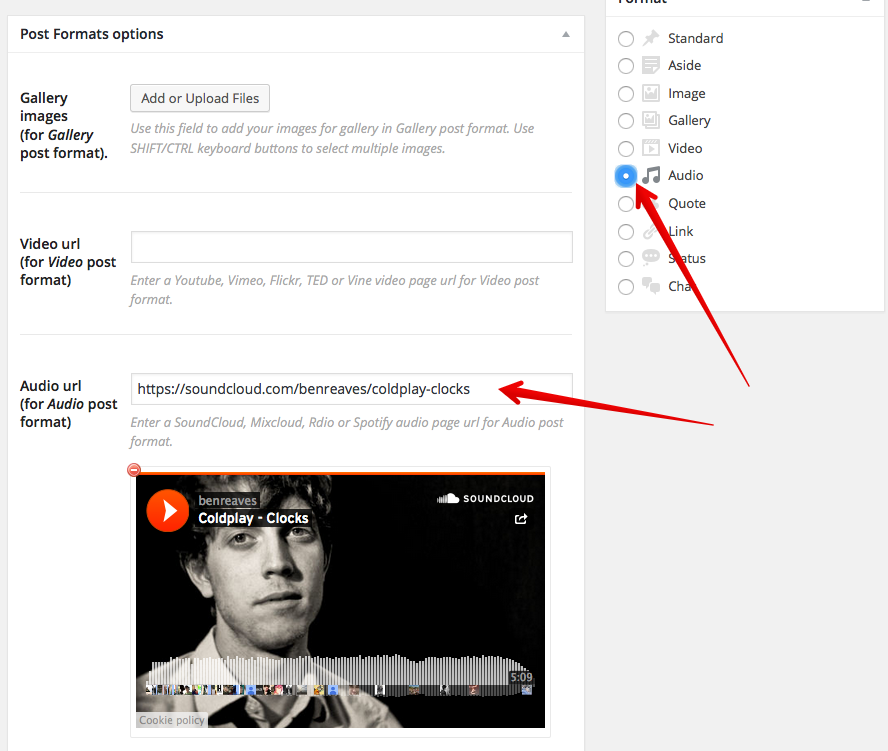
- Save your post. Now it will display your audio instead of Featured image.
Do not add your video file or audio file url directly, this will not work. You should use supported video and audio services only (like vimeo or soundcloud) to upload your files and add to blog.
COMING SOON PAGE SETUP
You can use Coming Soon feature when you just develop your site, that allow you temporaly disable website frontend for regular visitors (they will see your custom Coming soon page), but allow website administrators to see site and work on it.
You can use this plugin to enable coming soon mode on your site:
WIDGETS MANAGEMENT
This theme have 5 widgets sidebars where you can add widgets:
- Page Sidebar (Right or Left)
- Posts listing sidebar (Right or Left)
- Single Post Sidebar (Right or Left)
- Footer light sidebar with 4 columns
After theme installation all WP widgets will be enabled (if you have WP fresh installation) so you need to turn off default widgets that you don't want to see:
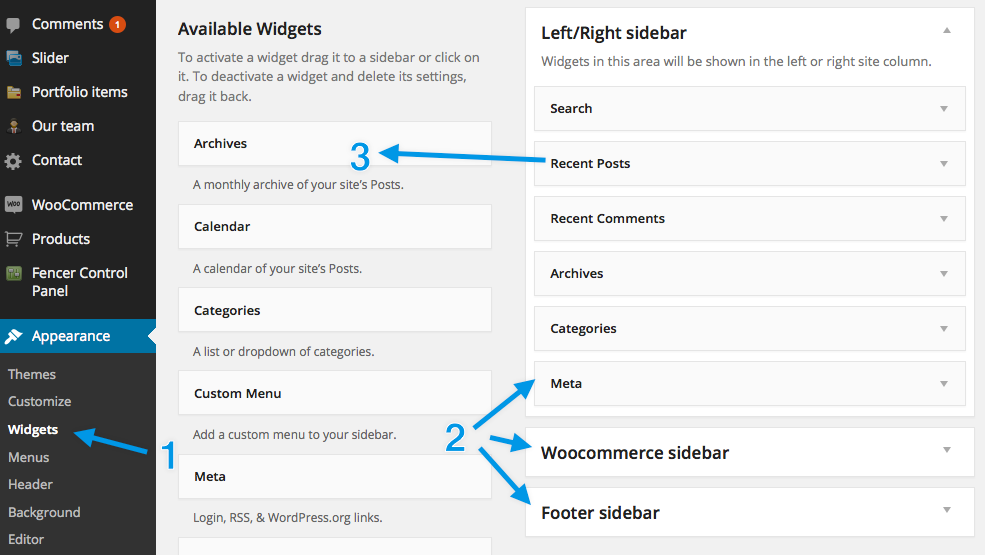
- Go to Appearance > Widgets
- Move widgets from left "Available Widgets" block to right sidebar that you want to use to add it to display in theme
- Move widgets from right sidebars block to left "Available Widgets" block to remove it from display in theme
Our theme have 5 special widgets for your blog that improve default WordPress widgets functionality, we recommend you to use this widgets instead of default:
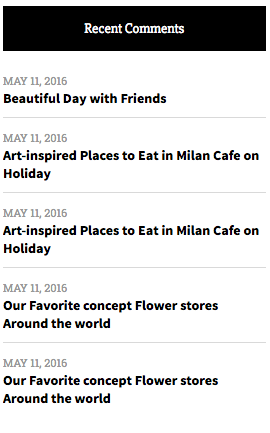
- Milana Recent Comments - display recent blog comments with author name and date
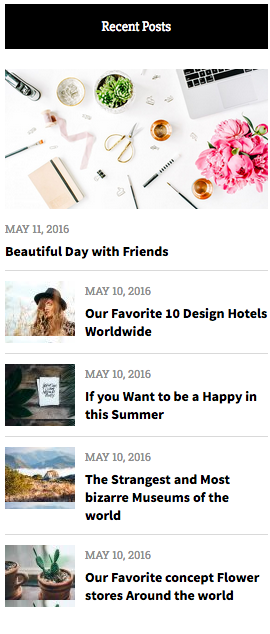
- Milana Recent Posts - display recent posts with thumbnails and first big post image and images animations
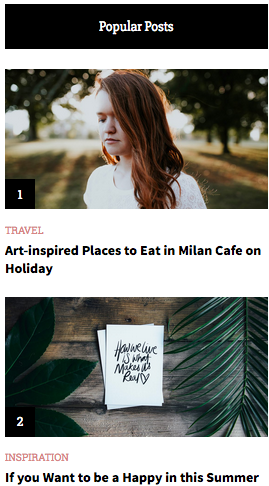
- Milana Popular Posts - display most viewed posts with thumbnails and numeration
- Milana Content Widget - display any HTML content in your widget, with support for image background button, and predefined HTML styles
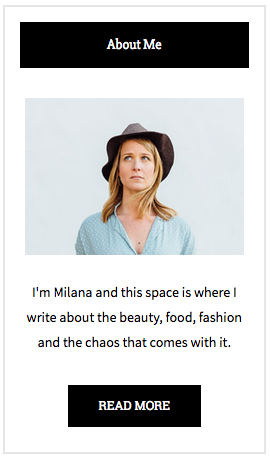
You can use any shortcodes from any plugins in Content Widget, for example to show Mailchimp subscribe form in this widget:
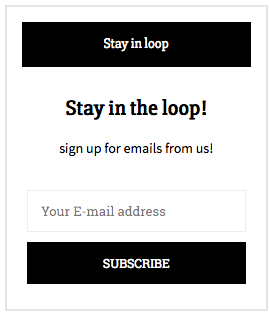
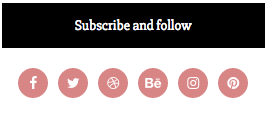
- Milana Social Icons Widget - display social icons with links (use theme control panel settings for social icons)
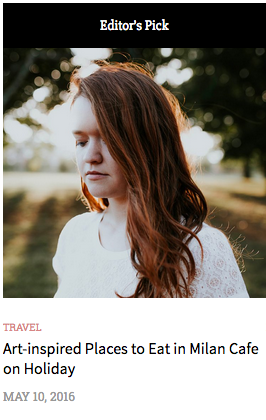
- Milana Posts Slider Widget - display posts slider with your posts by different criteria and settings (latest posts, posts from category, featured posts, popular posts, editor's picks posts)
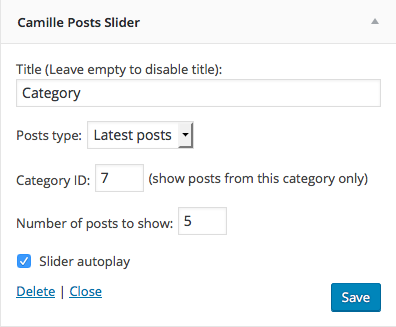
How to add instagram feed to widget
You can show Instagram Feed block in you widget sidebar, you can read how to do this later in this documentation in Instagram Feed setup section.
How to USE SPECIAL Milana CONTENT WIDGET
Our theme have special text/content widget that allow you to show nice blocks with any HTML content, shortcodes, background image, buttons, etc.

Let's create sample widget:
- Go to Appearance > Widgets and add Milana Content widget to your sidebar.
- Change Widget Settings:
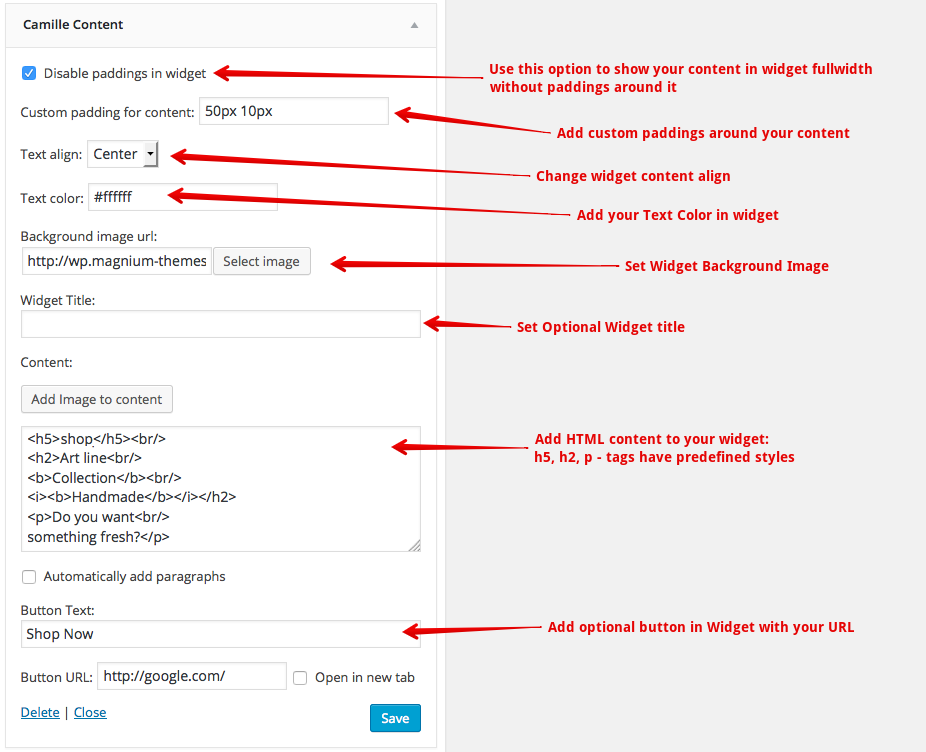
- Use this HTML sample code in Content if you want to have the same styles as our demo widget:
<p><img src="http://wp.creanncy.com/milana/milana-1/wp-content/uploads/2016/11/widget-about-2.jpg" alt=""/><p>
<p>I'm Milana and this space is where I write about the beauty, food, fashion and the chaos that comes with it.</p> - Save widget setttings.
Instagram PLUGIN setup
If you installed Instagram Feed plugin (provided with theme) you can display your instagram feed in theme widget sidebars (or in other places using shortcode) or in theme footer.

How to enable this feature:
- Go to Instagram Feed section in left WordPress admin panel menu (plugin should be installed).
- Click big Login button and login to your instagram account. You will see your Access token and User ID after this. Copy this data to corresponding fields below.
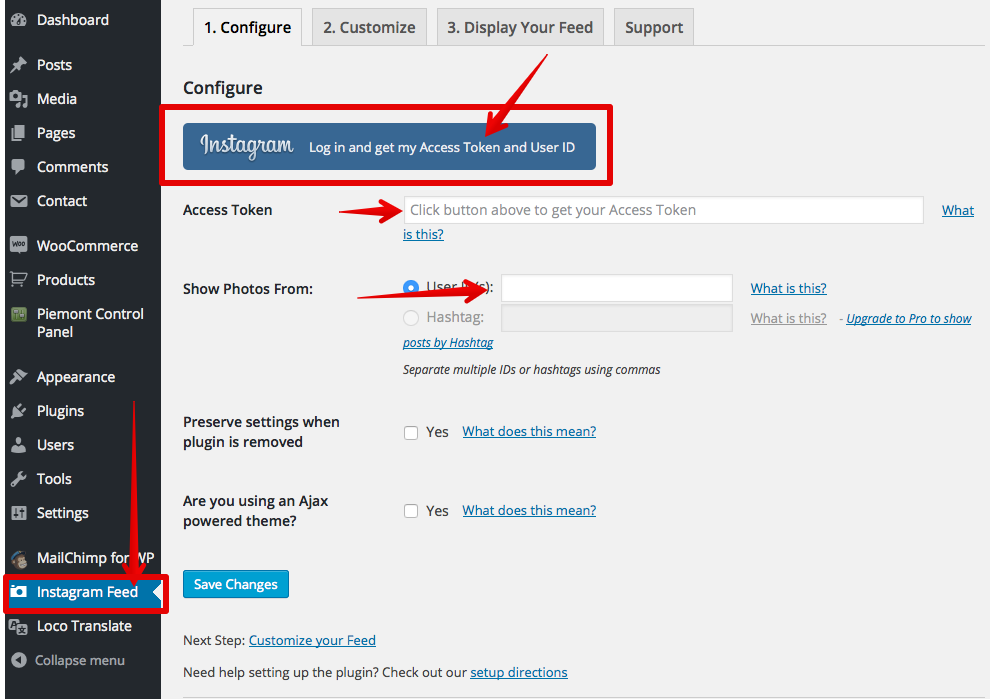
- Save Changes and click Customize tab.
- Set values for options like you see on screenshot below:


- Save settings.
Add widget to sidebar:
- Go to Appearance > Widgets and add Text widget to your sidebar.
- Copy and paste this shortcode to this widget content area:
[instagram-feed num=9 cols=3 showfollow=false] - This code display 9 photos in 3 columns, without follow button. You can change this settings in shortcode. You can check all available shortcodes in Instagram Feed widget documentation.
Add Instagram to theme footer:
- Go to Appearance > Theme Control Panel > Footer and Enable instagram display with your settings.
- Save settings.
Mailchimp subscribe setup
If you installed Mailchimp for WP plugin (provided with theme) you can display subscribe/signup form for your Mailchimp newsletter campaign in sidebar widgets.

How to enable this feature:
- Go to Mailchimp for WP > Mailchimp section in left WordPress admin panel menu (plugin should be installed).
- Add your API key to MailChimp API key field (use Get your API key here link to obtain your key).
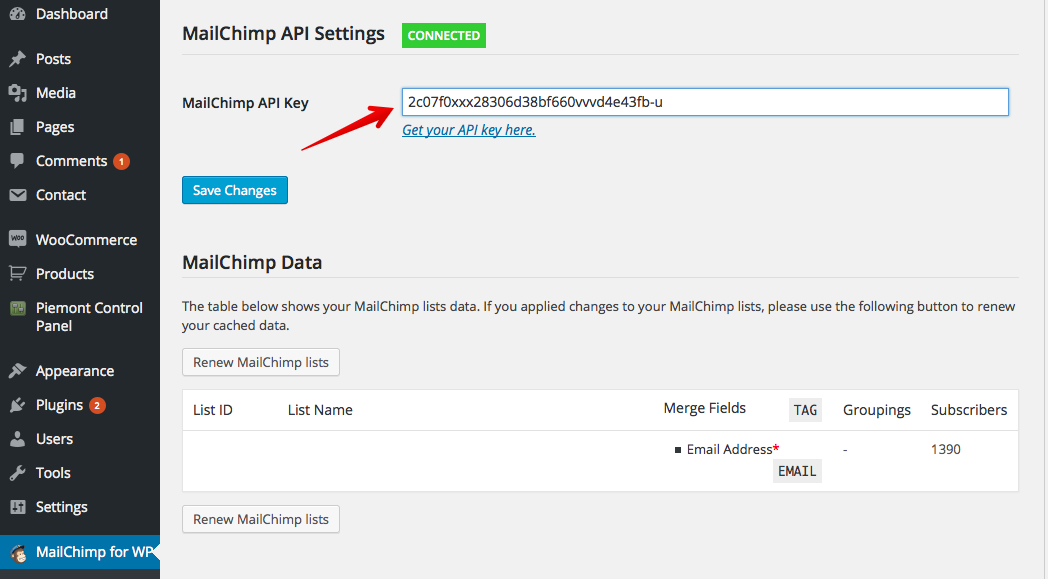
- Save Changes.
- Go to Mailchimp for WP > Forms
- Check your list for Lists this form subscribes to option to set what list will be used to subscribe your users on MailChimp.
- Copy and paste HTML code below to Form mark-up field:
<div class="mailchimp-widget-signup-form"><input type="email" id="mc4wp_email" name="EMAIL" placeholder="E-mail address" required /><input type="submit" class="btn alt" value="Subscribe" />
</div> - You can change texts in code to your own.
- Save changes.
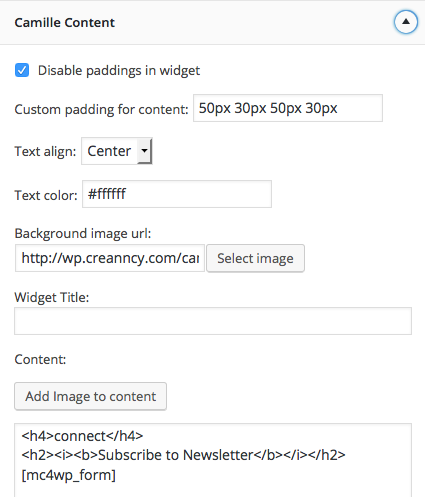
- Go to Appearance > Widgets and add Milana Content Widget to your sidebar with this content inside:
<h3><b>Stay in the loop!</b></h3>
<p>sign up for emails from us!</p>
[mc4wp_form]
- Select this Settings for widget and upload your background image:
- Save widget.
- Now you should see your Signup form in sidebar widget.
CTA POPUPS MANAGEMENT
You can show advertisement popups to show some call to actions to your customers (for example mailchimp subscribe form or some offers). We included Icegram plugin with theme that allow you to show popups, messages, toasts and other CTA blocks on your site with different desings and settings.
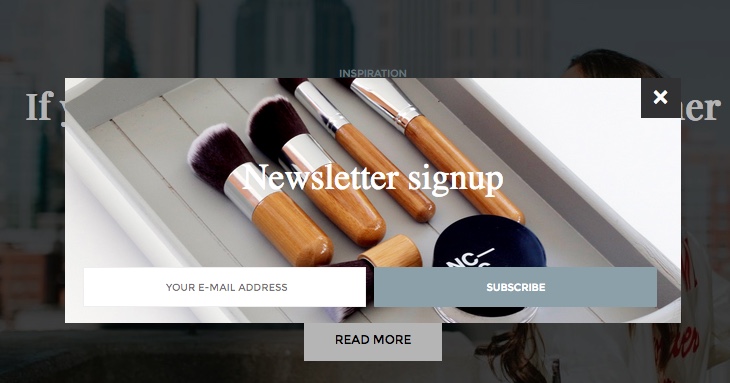
How to enable this feature:
- Go to Icegram > Campaigns section in left WordPress admin panel menu (Icegram plugin should be installed).
- Create new Campaign.
- If you want to create Mailchimp subscribe block popup similar to our demo you should use this settings for popup:
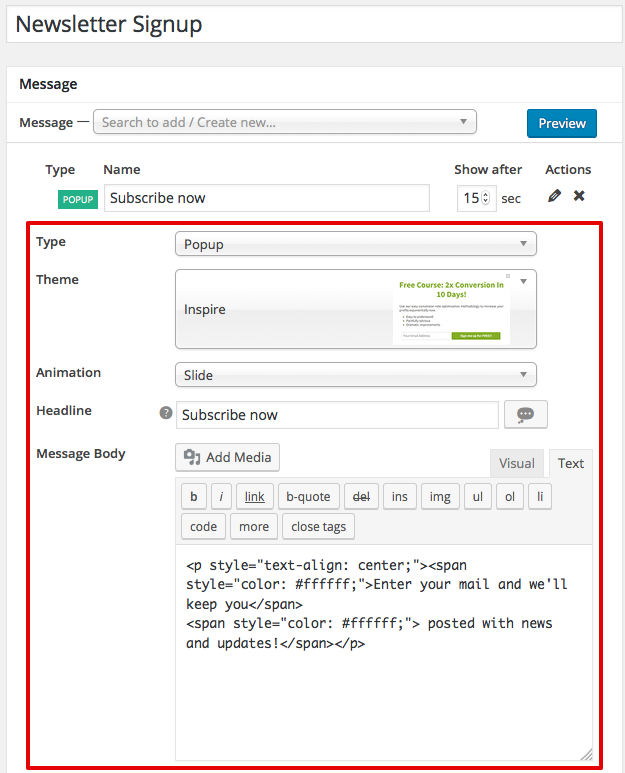
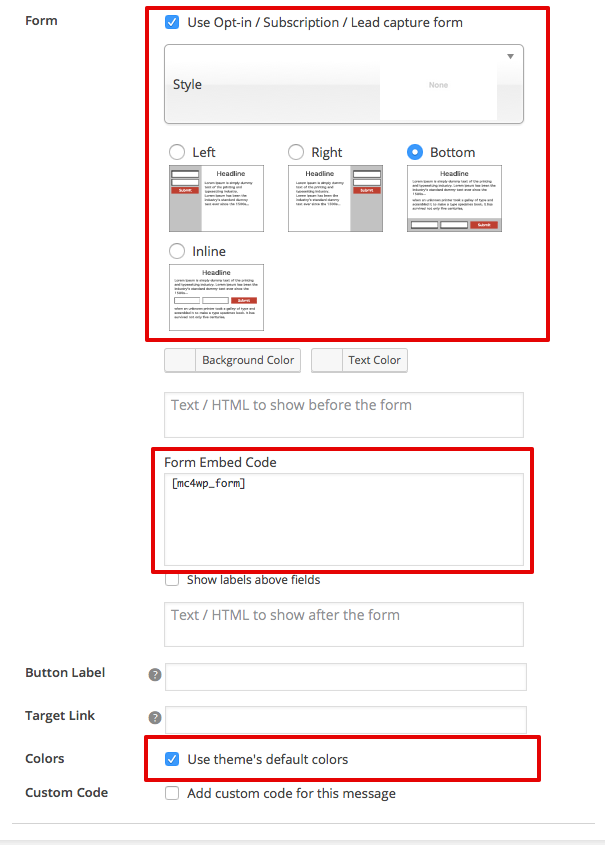
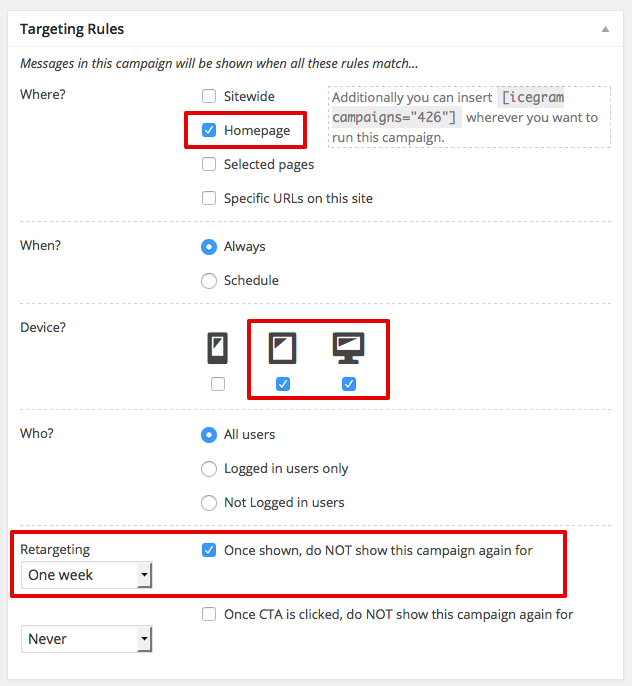
- Save Changes.
- You can use different settings and options to make different popups. Our demo is just an example.
ADVERTISEMENT MANAGEMENT
Our theme have built-in feature for banners/ads management that allow you to add any banners or other html in different predefined places in theme design.
How to use this feature:
- Go to Appearance > Theme Control Panel > Ads Management.
- Click place when you want to show your banner and add your banner HTML/image to this area.
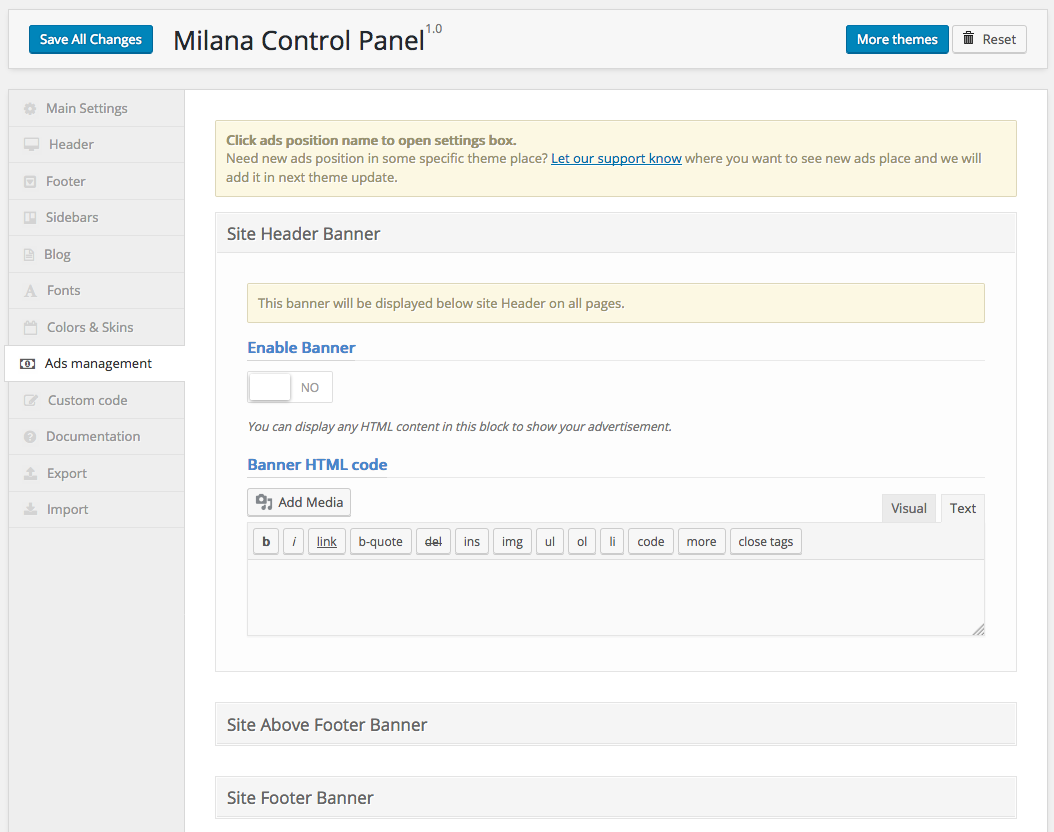
- By WordPress security rules you does not allow to use JavaScript, PHP and iFrames in this areas. If you really need this you can contact our theme support to enable this unsafe feature on your own risk.
- Save Changes.
Theme shortcodes
Our theme include shortcode(s) that you can use in posts and pages content and your sidebars inside Milana Content and default WordPress Text widget's.
Social Icons shortcode
Shortcode will display your social buttons with urls that you configured in Theme control panel > Header.
Usage:
[creanncy_social_buttons]
Options:
This shortcode does not have options.
Demo:
JetPack Infinity Scroll
Our theme support WordPress JetPack plugin Infinity Scroll feature (you will have infinity posts auto loaded via ajax on your blog page when user scroll down your page).
Infinity Scroll feature work with simple theme layouts only (it will not work with complex layouts like Masonry, Two column, etc).
- Install and activate JetPack plugin on your site. You can do this in Plugins > Add and search for it.
- Go to JetPack > Settings and Activate Infinity Scroll feature.
- You can adjust how many posts will be visible before loading new on scroll in Settings > Reading.
THEME Settings
You can manage multiple theme settings in our Milana Control Panel module.
- Go to Appearance > Theme Control Panel from left menu in WP admin panel
- Click Save button first time to apply default theme settings to theme
- You can manage a lot of theme options from this panel, check all available Tabs with settings.
- If you want to reset settings to default values you can click Reset button at the top right
- If you want to Preview site after some changes you can use Toggle Preview button to display/hide your site frontend without leaving admin panel
- After you made any changes you should click Save button to save theme settings
- You can Export all saved settings to file, use Export tab for this feature
- You can Import your saved settings file or data in Import tab.
Translations
This theme is translation ready and WPML plugin compatible and this mean you can easy adapt it to your language or use it multilanguage. You can translate theme manualy of using Translation plugin that we included with theme.
Manual theme translation
We included POT files for translation with theme:
- /wp-content/themes/milana/languages/ - main theme translations
Read this section on Wordpress website about WP translations.
Translation with provided THEME translation manager
If you installed and activated Milana Translation Manager (plugin provided with theme) you can translate theme with it:
- Go to Loco Translate > Manage translations
- Click New language near our theme in list
- Translate all theme strings in admin panel
WPML PLUGIN (MULTILANGUAGE WEBSITE)
Here is what you need to know on turning our theme multilingual with WPML.
First, you need to to purchase a recent version of WPML, including the String Translation and Translation Management modules.
Please not that you need to purchase 1 additional Regular theme license for our theme for every language on your site. For example if you have your site versions in English, German and Italian languages you need to purchase 2 additional regular theme licenses (in addition to current one that you have for English).
Initial Setup
- Install and activate the core WPML plugins (WPML Multilingual CMS, WPML String Translation, WPML Translation Management), and then other WPML plugins that may depend on them.
- Set up WPML from WPML > Languages. See WPML Getting Started Guide for complete reference, but the initial simple three-step setup is self-explanatory, asking you to choose your default language, a set of active languages, and a language selector.
Translating Pages, Posts and other post types
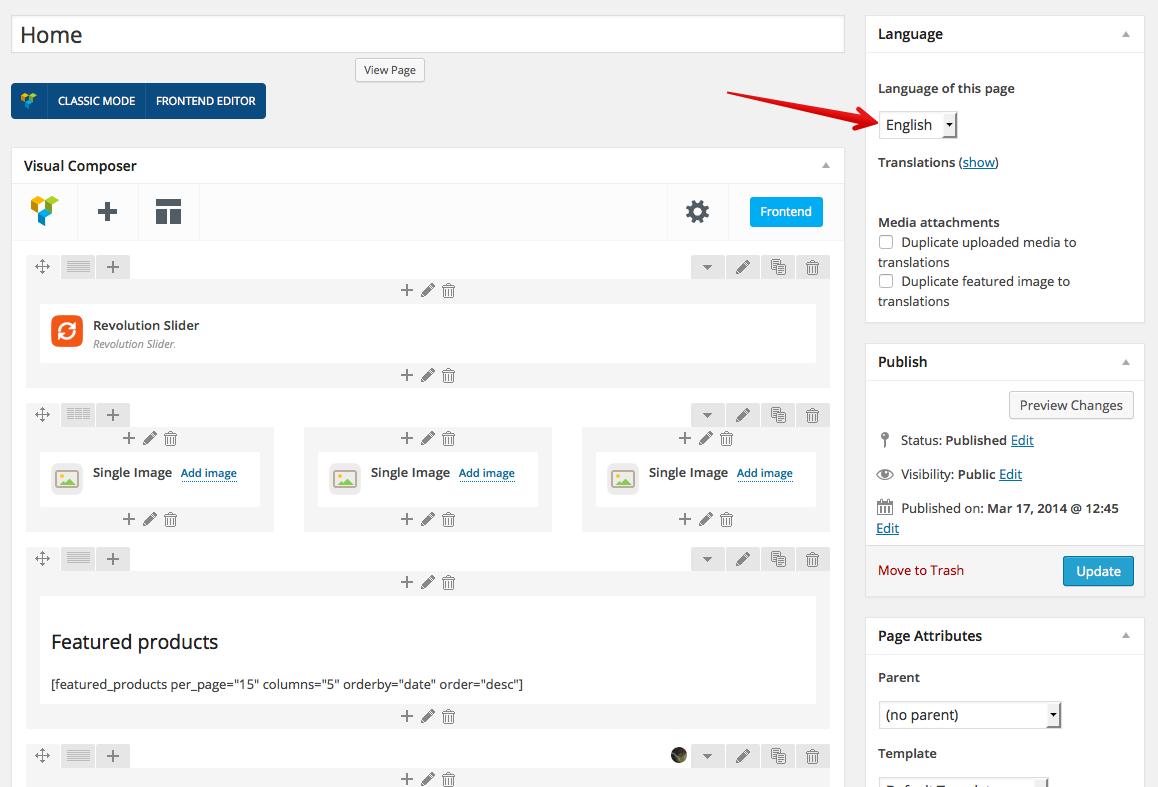
To translate a page you need to go to WordPress admin panel > Pages and in the list you will see columns for each active language, with a pencil icon (for ‘edit translation’) or a ‘+’ icon (for ‘add translation’) next to each page. Go ahead and edit or add the translated page for your Homepage.
Right now you just need to translate your page into the new language:
Read this to easily duplicate your existing content.
Translating custom post types and taxonomies
Our theme and some plugins can have extra custom post types, and custom taxonomies. In order to get a similar interface for translation/duplication as for posts and pages, you need to go to WPML > Translation Management, and select the tab ‘Multilingual Content Setup’.
Translating Menus and Language Switcher in Header
WPML can synchronize menus for you. This means that if some entries, for example some pages, posts or categories, are in the English menu, WPML can generate and keep in synch menus for other languages pointing to the translated versions of these pages, posts or categories.
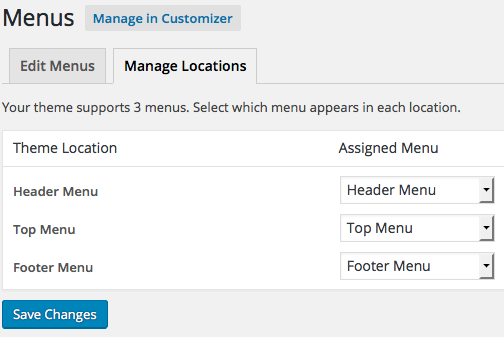
From WordPress Appearance > Menus you can see your existing menus and add menu translations and synchronize menus across translations.
To use Multi Currency on your website you need to install WooCommerce Multilingual plugin for WPML.
Translating theme texts and other strings in your site
To translate strings you need to follow the procedure for Theme and Plugin Localization. Go to WPML > Theme and Plugin Localization, and click on ‘Scan the theme for strings’ and you will see theme strings and which ones are translated or not.
Child theme usage
You can use our theme as Child theme. Check our special article how to do this.
Speed up your website
Our theme created for very fast and effective work, with correct server configuration and content optimization you can get 85-90 / 100 score in Google PageSpeed Insights test.
Site speed depends on several things in addition to theme (that already coded for extra fast work), like WordPress configuration, Server configuration and quality and Content optimization. We included simple guide how to optimize your website for extra fast work with our theme.
Useful advices for site Speed Up:
- Make sure that you have good hosting/server (we recommend to use Bluehost to host WordPress themes)
- Disable all third-party plugins that you does not use
- Check this official WordPress Optimization guide article and external article links in it. Follow all guides in it (especialy image optimization, server setup and optimization)
If you don't want to configure your website optimisation yourself you can order special service:
- Order Premium WordPress Website Google Page Speed and SEO Optimization service on Envato Studio.
Theme Updates
You will see when theme update available on our website and in email from Themeforest (if you subscribed for theme updates notifications).
Always backup your website before updating theme or plugins!
Read this article - How to update WordPress theme
MANUAL theme update
- Download latest theme archive from Themeforest (FULL theme archive with documenation, not just theme installation file).
- Unpack archive and open Documentation/release-history.html file in your browser for view (not for Edit).
- Follow instructions in file to update your theme.Back to top
- Do not update plugins bundled with theme yourself (even WooCommerce), before we will not add this updated plugins to our theme and tested it compatibility.
Automatic theme and plugin updates
If you newbie you can use this plugin for easy plugin and theme updates:
We don't provide any support for any issues that you can get from this plugin and does not test our updates with this plugin. We recommend you to use manual theme update.Support
We offer theme support and updates for our items.
Use any of this options to subscribe to theme updates releases notifications:
- Check our site - Creanncy.com
- Signup to our newsletter
If you have any questions about this theme you should:
- Check WordPress section in our FAQ page
- If you don't find answer submit support question in our support system
- If you need customization service or WP/Theme setup - contact us
Please dont ask support questions in Themeforest comments, email, skype, facebook or twitter - questions in this places will never be answered.

